I’ve many a time, whilst walking along on a backpacking trip contemplating the weight of my pack, pondered the possibility of making a lightweight insulated vest, to use on warmer weather trips where my insulated jacket may be considered overkill. Whilst many an hour has been frittered away thinking about how such a garment might look and how I might go about making it, I’ve never acted on those thoughts … until yesterday.
Skipping back in time, in June last year I decided to make a new top half of our backpacking quilt. After testing the concept of the quilt quite thoroughly, we had firmly come down on the side of ‘like’, which I thought warranted splashing a bit of time and money on making the top half lighter and (most importantly) more compact. Why just the top half? Because that’s the half that I carry! Oh, and because it’s the bigger half* and, being made with synthetic insulation, it took up quite a lot of space in my pack. Plus, by the time I came to order materials in mid-June, I wasn’t sure I had time to make a whole quilt before we went off to the Pyrenees.

I couldn’t get the lightweight material in blue to match the original fabric, but quite liked the colour combination of the end result. The main objective was to reduce bulk, but I also reduced the weight of my half from 721g to 493g.
Whilst Mick’s half isn’t any bulkier than his old sleeping bag, when I suggested that I could replace his half too, he saw sense in the offer. Which is how I came to be furtling through my box of quilt-making offcuts** yesterday, to see if I had anything useful left over, which is how my mind turned back to the subject of making an insulated vest.
It’s a project that would have gone better if I had a pattern. I did find a set of instructions online, albeit for a gillet rather than a vest. So, I went freestyle, employed a roll of Monsters Inc Christmas wrapping paper and came up with a pattern.


The liberal use of clothes pegs to keep lining fabric and insultation together for sewing
After an inordinate amount of time spent staring at the material and pondering at great length, I decided the thing wasn’t going to get made unless I got on with it, so onwards I ploughed, hoping that at some point in the process I’d get to grips with where I needed to leave gaps to turn the whole thing the right way in later on, and how I could go about putting in the zip.
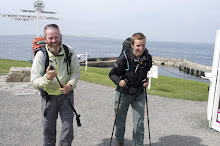
As you can see from the shots below (in my very best model poses!) I did manage to come up with something wearable, although I’m hoping that you can’t quite see how wonky the zip is, nor how uneven the collar. It’s a very trim fit, which wasn’t intentional; I now know where I went wrong in my calculations. I also now know a lot more than I knew yesterday about how to go about making one of these things. In fact, in ordering the materials for the new half of the quilt, I nearly ordered extra for another vest, knowing that I’ll do it better next time. In the end, however, I decided that this one is functional, even if not pretty.

Front, zip undone.
The inner fabric is the same as the outer. The use of this material puts me in the unusual position of having a garment that perfectly matches a couple of my stuff sacks.

Front, zip done up

The back of the neck wasn’t meant to be that shape. I managed to sew the outer layer on the wrong way, such that I had the front outer attached to the back inner and insulation and vice versa. Having sewn the whole way around all the edges by the time I noticed, there was no way I was unpicking, so a bit of free-hand snipping was done and I have a vest with a bit of a scoop neck at the back.
My existing Rab Xenon Hoodie weighs in at 300g. The homemade vest is 130g and has much more loft. I’m comparing apples with oranges, but as the Xenon was my previous lightest option for a warm insulating layer, the vest will represent quite a saving for warmer weather trips. The total cost of the finished article (bar the opportunity cost of what else I could have done with the material) was £1.49 for the zip.
* Yes, I know that technically it’s not possible to have a big half, but you know what I mean…
**after making one single and one and a half double backpacking quilts, I have quite a collection of offcuts, most of which I’ve now decided are no good for anything and are now in the bin. I did, however, have enough insulation for the vest. The shell material I also happened to have lying around as an offfcut..


Brilliant. Well done.
ReplyDelete'Brilliant' may be a little bit of an overstatement, but thank you ;-)
DeleteThat looks good, I'm impressed with the light weight. Very practical - a business opportunity perhaps?
ReplyDeleteNot a chance! My sewing skills (and speed) are very firmly suited to making things for myself only.
DeleteThis comment has been removed by the author.
ReplyDeleteI can't decide which pics amused me most...the pegs are genius! But, don't give up your day job. I have (briefly) toyed with the idea of making a quilt or sleeping bag. Not likely to get any further than that, me thinks, I take my cap off to you!
ReplyDeleteI can't take credit for the idea of using pegs to stabilise insultation material against slippery pertex - the idea was entirely taken from the instructions for the Ray Jardine quilt kit.
DeleteGood job I don't have a day job to give up, isn't it? Although, if I did make another one, I can guarantee that it would be a lot prettier. I do (generally!) learn from my mistakes.
...but, while I'm not thinking about it, where do you get your supplies from?
ReplyDeletehttp://extremtextil.de/
DeleteThere's also thru-hiker.com, but they aren't able to state a shipping charge in advance (you have to pay $45 and they refund the difference between what you paid and the acctual cost plu $5 handling). Plus, there's no issue of import duties in shipping from Extremtextil, as they're in Europe.
Thank you, off to drool...
DeleteImpressive Gayle, it will be trousers next?????
ReplyDeleteYou may jest, but that's exactly what I did make on Wednesday. Not an insulated pair, nor for backpacking - just a pair of fleecy lounging-around-the-house trousers. Contrary to the job I made on the vest, I was rather proud of the end result with the trousers. What a difference it makes to have a pattern!
Delete